Easing Keyframes are one of the most useful types of keyframes and are the apple of the eye of the advanced developers of Keyframe animations. Have you ever wondered what are easing keyframes and why you are not able to create smoother, fluid-like animations after trying again and again? If yes, then we have good news for you, There is a secret to creating smoother and more fluid animations that is used by most professional editors. The secret to success in the animation industry is mastering “Easing Keyframes”. In this guide, we will provide you necessary ingredients to create stunning animations.
Easing Keyframes are one of the most useful types of keyframes and are the apple of the eye of the advanced developers of Keyframe animations. Have you ever wondered why you are not able to create smoother, fluid-like animations after trying again and again?
If yes, then we have good news for you, There is a secret to creating smoother and more fluid animations that is used by most professional editors. The secret to success in the animation industry is mastering “Easing Keyframes”. In this guide, we will provide you necessary ingredients to create stunning animations.
What are Easing Keyframes?
Easing keyframes are a type of keyframe that provides an increasing or decreasing motion to your animations and makes your motions feel realistic. It gives the user more control over the animations because you can alter the motion speed and direction according to your requirements. The easing factor, which uses a change in the rhythm of motion with time, could be used in any element that supports keyframes such as rotation, color, opacity, etc.
Keyframes play an important role in the content industry as they are the backbone of the animations, and to create a more natural-looking animation, you must master the Easing Keyframes. There are many types of easing, but the most common type of Easing are Ease-in, Ease-out, and Ease-in-out.
Ease-in
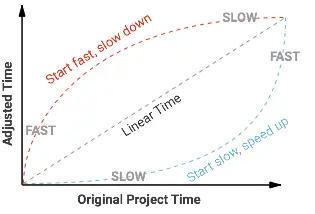
You can use Ease-in for elements that need to leave the screen, as the elements will start at a slow speed and gradually increase their speed. Think of a car standing at a point, and the driver starts accelerating it, and it will gain speed gradually.
Ease-out
It helps you to produce a naturally looking intro of a video where an element enters the screen with speed and over time it slows down and then it stops. To understand the motion of Ease-out, think of a car that is moving rapidly and it applies brakes, its speed will gradually reduce and it will stop at a point.
Ease-in-out
If you want to move an element on the screen from one place to another, then you should consider using this easing type. You can also mark a pathway for your animation.
Click Here if you want to get Alight Motion APK for PC
Advanced Easing Types
There are multiple uses of Easing in keyframes, and you must master it to become a pro at animation creation. You can create some stunning animations using easing effects. Let’s explore some of the advanced uses of Easing.
Bounce
This creates an animation effected by gravity. You can specify a value, and your object will start its motion from the initial point and move towards the second point as if there is a gravity pulling towards the second point, then it bounces back and repeat the motion. The gravity doesn’t have to be in the downward direction, you can also use it sideways, or it can be directionless, like for example, a color.
Elastic
It creates a spring-like motion, when released, it instantly shoots towards the final point and comes back to its originating point.
Cyclic
Have you ever seen a pendulum? Or a clock that keeps on repeating its cycle? Well, this Cyclic Easing creates a repeating motion that keeps on repeating its specified cycle.
Steps
It creates a motion in intervals rather than a fluid-like motion. It resembles the Time Quantizing Effect but with more control and could be applied to any element separately.
Elastic Steps
It creates steps like motion but with added elasticity to the motion in intervals.
Linear Keyframes Vs. Easing Keyframes
Easing keyframes are superior to linear keyframes because liner keyframes give the animation an unnatural feel because they move at a constant speed and in real life nothing moves at a constant speed. Easing keyframes give you a more natural feel because it moves like a car which starts slowly and accelerates and then from the high speed it slows down and stops naturally.
Most people don’t understand the value of using the right animation type and they unknowingly use linear keyframes for every type of motion, for instance, person A uses linear keyframes for a ball-bouncing animation and person B uses easing keyframes for the same animation. You can clearly see that the animation created by easing the keyframe has a smoother as well as natural feel whereas the linear keyframe makes it a more robot-like animation.
If you are really serious about this field, then you must explore easing Keyframes and learn how to choose and use the right type of keyframe for your required animation.
How to Use Easing in Alight Motion APK?
Easing could be applied to anything where you can apply keyframes, whether it be location, color, opacity, etc. Let’s explore how to apply easing:
Conclusion
If you are looking to improve your animation skills, then you must focus on mastering Easing in keyframes. Not many people know this, but it is the secret weapon of most advanced developers. This guide will help you to get a basic concept of easing, Easing and you can also start using Easing keyframes on Alight Motion. The only thing you need to do is practice everything discussed in this guide, and you will become a pro at animation pretty soon.
